- 25shares
- 17
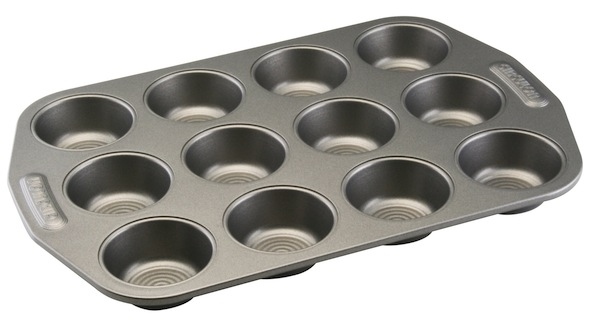
A Dozen More Clever Muffin Pan Uses
More Muffin Pan Recipes
If you read my first muffin pan post then you know that I’m a big fan of muffin pans, both large and especially the cute little mini ones. They take about the same effort to make as their larger versions, yet are so much easier to serve, display and consume. Large or small, anything made in a muffin pan is sure to have plenty of fans!
So, I’ve put together another set of 12 recipes that use muffin pans. Some use a regular sized muffin pan and some use a mini muffin pan, one prefers a muffin top pan (if you should have one) and one even turns the pan upside down. Make anything from breakfast through dinner and on to creative desserts. Hopefully, you’ll find a few in this group that you think are worth a try.
More Muffin Pan Recipes
1) Cookie Cups:
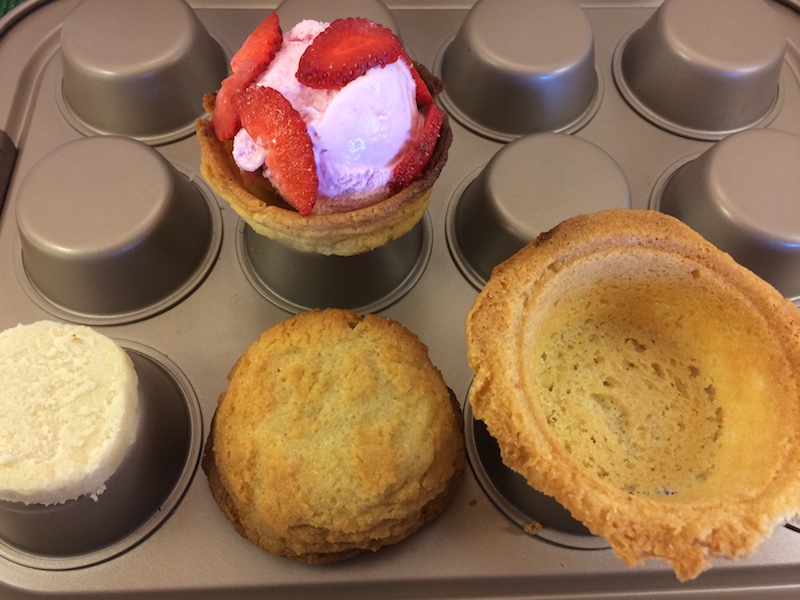
Serve these cups filled with sorbet and fresh summer berries or with a favorite pudding and whipped cream.
To Make Cookie Cups:
-
Roll shortbread cookie dough to 1/4 inch
thickness
then cut out circles using a biscuit cutter.
Make sure the circles of dough are larger than the bottoms of the muffin tin cups. You can also cheat and use a roll of Pillsbury sugar cookie dough cut into slices. - Turn the muffin pan upside down and spray the underneath side with a cooking spray.
-
Place the cookie slices on top of the
holes.
Gravity will pull the dough down the sides of each hole as the cookie slice melts in the oven and then bakes onto the sides of the hole if you’ve used sugar cookie dough. If you’ve used shortbread dough then you need to use a larger circle than the size of the hole and gently start the dough down the sides and press gently. - Bake according to your cookie recipe.
- Remove the pan from the oven and immediately loosen each cup from the hole, but leave them to cool right on the muffin pan.
- Fill the cookie cups just before serving to prevent a soggy shell.
2) Boston Cream Cupcakes:
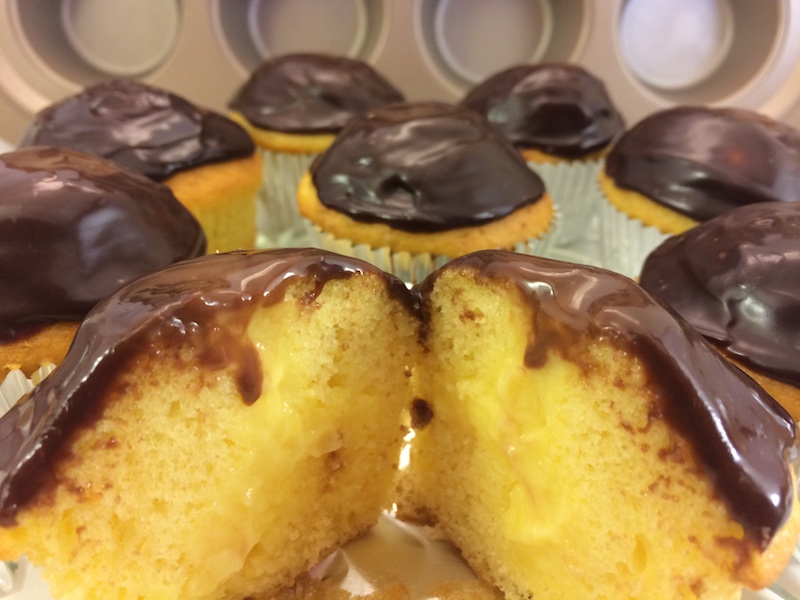
Individual sized Boston Cream Pies! Boston Cream Pie is a great treat, wouldn’t it be great to have and hold your very own? Well, that could not be any simpler with this easy 3 step recipe.
To Make Boston Cream Cupcakes:
- Prepare a yellow cake mix according to the package directions for cupcakes (be sure to use cupcake liners).
-
Pipe about a tablespoon of prepared and cooled
vanilla pudding into the center of each
cupcake
once they’re completely cooled.
Insert the tip into the top center of the cupcake. -
Spread prepared hot fudge topping on top of
each cupcake.
Make sure the topping is at room temperature first or microwave it for about 10 seconds. We like Mrs. Richardson’s Hot Fudge usually sold on a shelf near the ice cream section.
Be sure to refrigerate any leftovers because of the pudding.
3) Frico:
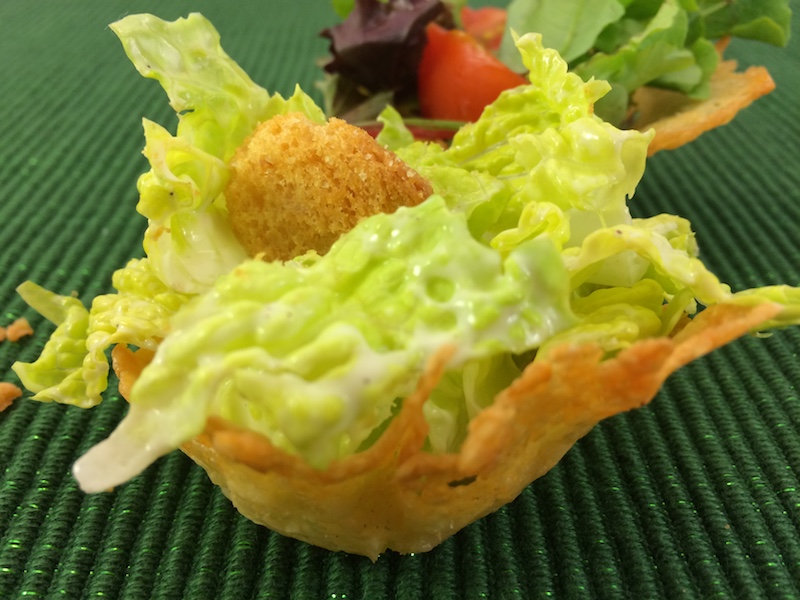
These crunchy Italian delights are wafer-like thin crisps that form after baking or frying shredded cheese. You need to start them off on a baking sheet, but then use your muffin pan to turn them into delightful little baskets. So, this one takes a bit of time and patience, but it’s worth it in the end.
To Make Frico:
-
Grate a
hard cheese
like Parmesan or Asiago into small flat
circles
two inches apart on a lined and rimmed baking
sheet.
Put about 3 Tbsp of cheese into each circle. You can also buy a container of finely grated cheese and just pour it onto the pan. -
Bake the tray at 375°F until melted, about 5 to 6 minutes should do.
You want the edges to be golden brown, if it doesn’t begin to brown then it will be chewy instead of crunchy. -
Use a thin metal spatula to gently lift each
pile of cheese into each muffin pan hole, or use the pan upside down like in #1.
Work quickly in order to get the cheese off the cookie sheet and into the muffin pan while it is still warm. - Press the cheese lightly with either a silicon scraper or use a clean spice jar to gently place in the middle of each muffin cup so that the warm cheese molds to the shape of the pan.
-
Cool and then gently lift each frico out of the
muffin pan
before filling with your favorite ingredients.
Most any fresh veggies work well or fill them with Cesar salad, sans the parmesan ingredient, since the bowl will crunch up into the salad instead.
5) Caramelized Onions:

The first step to many dinner recipes is very often to “caramelize some onions”. Save yourself some time each evening by doing a whole batch of onions and then freezing them in a muffin pan. You’ll have individual servings at your fingertips to add to a hoagie or begin a recipe whenever you want.
To Make Caramelized Onions for Freezing:
- Start with a large skillet and add about 6 tablespoons of butter until melted.
- Slice about 4 large onions (see our onion post to do this step tear free) and then add them to the melted butter.
- Stir to coat the onions in the butter and then continue to cook over low heat, turning and scraping until the onions are soft and lightly browned (about 20-30 minutes).
- Season with salt, pepper and a splash of white wine (if desired).
- Divide the mixture into the plastic wrap covered muffin tin and freeze for a few hours or overnight.
- Transfer the onions into a freezer safe bag.
Caramelized onions can be stored safely in the freezer for at least three months.
6) Cupcake Within a Cupcake:

Make use of both your regular size muffin pan and your mini muffin pan at the same time and then offer your guests a cupcake within a cupcake!
These are a nice addition to a color schemed party too, perhaps using a favorite team colors. Imagine a dark chocolate frosting on the larger cupcake with a little orange buttercream on top of the mini cupcake – sound good to all Giants fans? These cupcakes make a great two color presentation at any team or school celebration.
To Make a Cupcake within a Cupcake:
-
Make a batch of cupcake batter.
Make one batch of cupcakes and end up with a few less cupcakes than usual or make two batches of cupcake batter and end up with a few more cupcakes.
Make the batters in either the same flavor or, if you like, mix things up with a complimenting flavor and/or color for the mini cupcakes. - Divide the batter(s) into both a regular size muffin pan(s) and a mini muffin pan(s) and bake for times appropriate to the size of the pan.
-
Frost both cupcakes once cooled,
again in either the same frosting or a contrasting
color/flavor.
Pipe the frosting onto the cupcakes so that it is high enough to accept and hold the mini cupcake when gently pressed into place after frosting.
NOTE: We suggest using a non-stick mini muffin pan for the little guys instead of cupcake liners. These cupcakes are perfect for those “can’t wait moments”… you’re dying to dig in but have to politely wait for everyone to sit (or stop talking or whatever)… you can just pop the little guy in your mouth and no one is the wiser (except you ).
More Muffin Pan Recipes
7) Baked Scrambled Eggs :

These baked, yet scrambled, eggs are perfect if serving brunch to a crowd. They can be done in a regular muffin pan, but come out perfect if baked in a whoopee pie pan (should you happen to have one).
To Make Baked Scrambled Eggs:
Also try adding some lean ham or cooked bacon, if desired, to the bottom of the muffin pan before the eggs are added.
8) Sweet Potato and Turkey Cupcakes:

This suggestion is similar to the meatloaf and mashed potato we did in our original post of muffin pan recipes, but is more suited to traditional fall flavors.
The ground turkey also has less fat than beef, so less chance of messing (or starting a fire) in the oven. These cupcakes not only look like dessert, but the sweet potato topping almost makes them almost taste like dessert.To Make Sweet Potato Turkey Cupcakes:
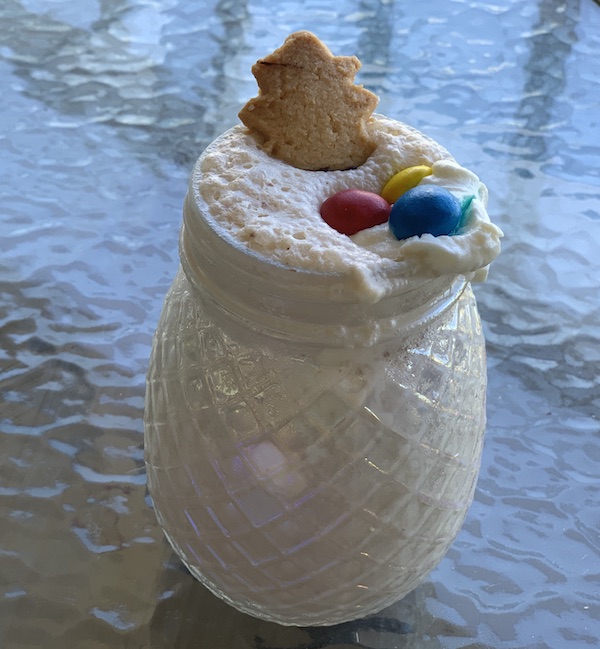
9) Ice Cream Cupcakes :
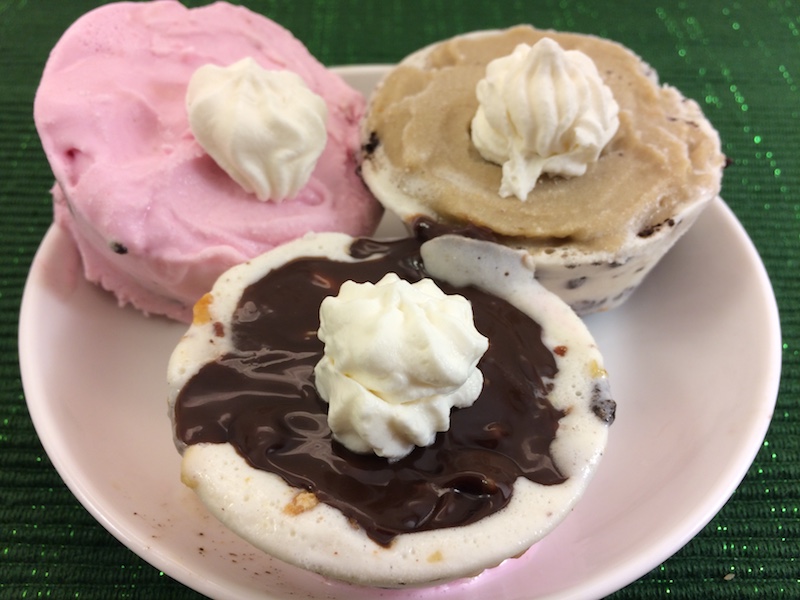
These cupcakes can be made all the same or individualized for each member of the family. They can be made with cupcake liners or without. Just use a plastic fork to gently nudge them out after freezing. We won’t bother saying how long they last in the freezer because honestly, they won’t last… as soon as they’re noticed, they’re gone!
To Make Ice Cream Cupcakes:
-
Gather your favorite ingredients
on the counter.
Pick the ice cream(s) and topping(s) that you want to use. Let the ice cream sit out on the counter to soften while the empty muffin pan sits in the freezer and you chop up your favorite cookie(s), fruit(s) and/or nut(s). I didn’t use cupcake liners this time, but serving the ice cream cupcakes is easier if you do use them. Once you’ve got everything ready to go it’s time to assemble the cupcakes. - Stir the softened ice cream with a large wooden spoon until it is well blended and looks like soft serve ice cream.
- Layer some soft ice cream into each muffin pan hole – lined first with a crust or cupcake liners, if desired.
- Follow that layer with a layer of cookie crumbs and/or nuts. Also try things like crushed waffle cones, pretzels and graham crackers.
-
Gently add another layer of ice cream.
If your cupcakes are getting too soft to accept another layer, simply place the muffin pan into the freezer for an hour before proceeding. The decision of when to re-freeze depends upon how perfect you want the ice cream cupcakes to look – freeze them between each layer for perfect lines when you cut them open. You can see that I was not going for perfection here, I was actually trying to use up several almost empty ice cream containers taking up space in the freezer. They don’t look as pretty but achieved the same great flavor and appeal regardless. -
Add any additional toppings.
Hot fudge is a good one to seal the top, just microwave it for about 10 seconds or so before spreading if it just came from the fridge. - Add a squirt of whipped cream to the top when serving, if desired.
10) Cherry Tassies:

These cherry tassies make a decorative display on any buffet table. To use fresh cherries instead, be sure to remove all the pits first as your front teeth will generally land smack dab in the middle of the cherry.
To make Cherry Tassies:
11) Chocolate Shells :

These shells make great containers to serve ice cream, use as the liners to make the ice cream cupcakes (above in #9) or become the crust for a mini chocolate mousse pie.
To make Chocolate Shells:
- Freeze an empty muffin pan then pour melted chocolate into the pan and circle the pan around as the chocolate hardens along the sides.
- Use a mini rubber scraper to help the melted chocolate cling all the way up the sides of each hole, or invert the pan and use the holes upside down as with the cookie cups in #1.
12) Anticipation Tray :
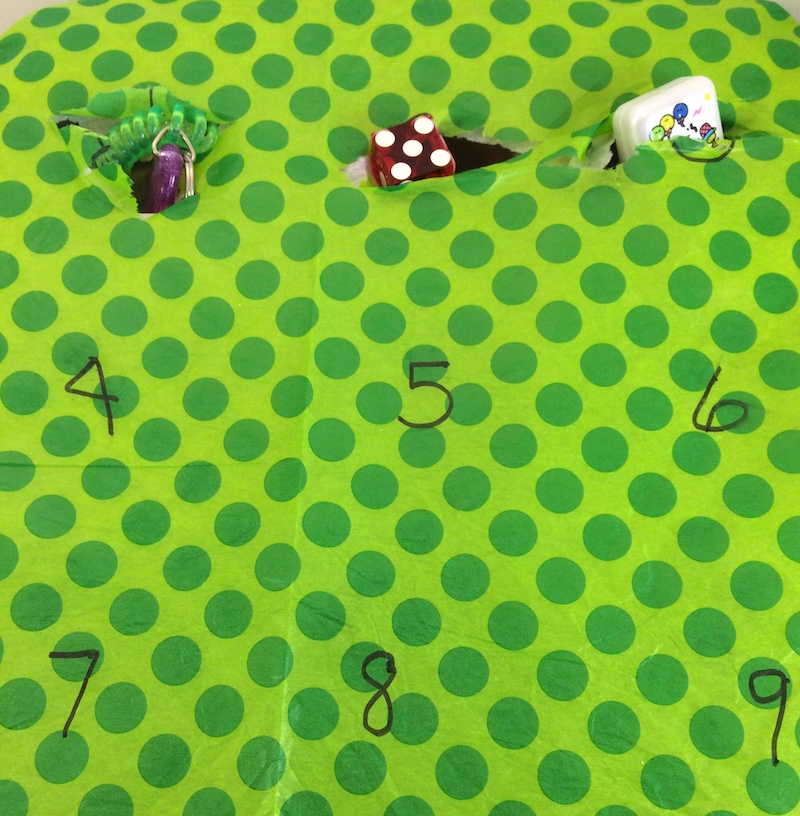
Celebrate the 12 days of Christmas or count down the days until a child’s birthday, big vacation or other future event with this handy tool. Having something to look forward to each morning and being able to count the days themselves can prevent the “are we there yet?” type of anticipation for a child. Plus, the cups on a regular muffin pan are big enough to hold a small toy, a homemade treat or a piece of candy (unlike most pre-purchased ones where you can’t fit much more than a penny or tiny chocolate into each slot).
To make an Anticipation Tray:
-
Slip a little something into all 12 holes of a
muffin pan.
Any small toys or wrapped candies work well. - Take a sheet of wrapping paper or 2 sheets of tissue paper and number the spaces gently with a permanent marker.
-
Cover the entire pan with the prepared
paper.
Tape down the edges of the paper underneath the edges of the muffin pan. - If desired, place a tiny slit into the center of each hole with a tiny cut using the tip of a sharp scissors. That way, the paper will break away easily when a child reaches into a hole each day. Beware though, it can also encourage peeking.
A Dozen More Muffin Pan Ideas
Additional Info
More muffin pan recipes can be found on our original muffin pan post.
To make easter themed muffin pan recipes, see our easter recipes.
To make quick bite sized Oreo cheesecakes, see our Mini Oreo Cheesecake recipe.
To make chili filled cornbread, try our Chili Con Cupcake recipe.
We hope these pictures and muffin pan recipes will bring your muffin pans out of the cupboard once again. Check out our FAQ to find out new uses for old tools. You just might find that you have other tools hanging around your kitchen that can be put to some new uses!
Our Favorite Food Storage Set!

With oven-safe glass and water-tight lids, these food storage containers are ready for action! Not a Prime Member? Try a 30-day free trial today!
Printed Date Definitions
▶"Best Before" Date Definition▶"Use By Date" Definition
▶"Sell By Date" Definition
▶"Shelf Life" Definition
Frequently Asked Questions
Click HERE for all of our FAQ’s▶
 Is All Oatmeal Created Equal?
Details the different types of oatmeal, how the
differ and how they are the same.
Is All Oatmeal Created Equal?
Details the different types of oatmeal, how the
differ and how they are the same.▶4 Amazing Quick Prep Tricks
▶
 Wine Sediment? How to remove and
then use wine sediment.
Wine Sediment? How to remove and
then use wine sediment.▶Is Kale Good For You?
▶
 Nutella cookies? How to make yummy
Nutella cookies.
Nutella cookies? How to make yummy
Nutella cookies.▶Do hard boiled eggs have to be refrigerated?
▶
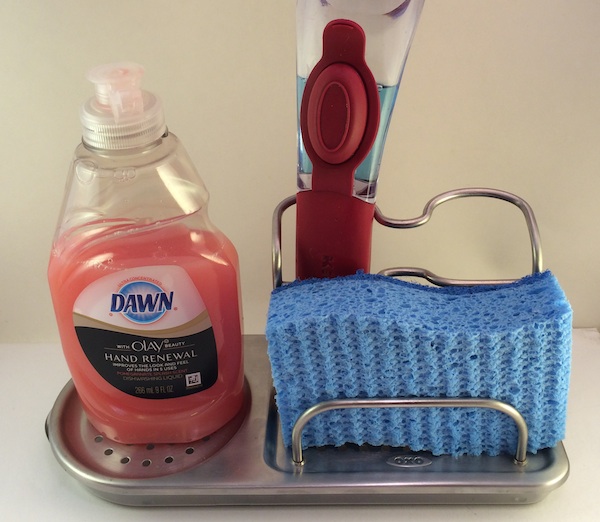 ▶How to keep your sponge clean? A
sponge harbors germs if not properly maintained.
▶Can You Freeze Cheese?
▶How to keep your sponge clean? A
sponge harbors germs if not properly maintained.
▶Can You Freeze Cheese?▶
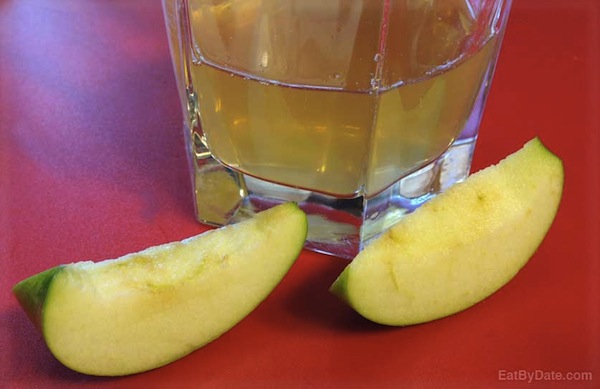 How to Keep Apples from Turning Brown?
Explore the ways.
How to Keep Apples from Turning Brown?
Explore the ways.
▶How long to cook corn?